So it's been a busy couple of weeks for me so far.
I decided to try a new "thing".
One month I paint figures. People figures, elves, orcs, dwarves, musketeers, pirates, cowboys, gangsters, whatever. Pretty much all "people" all the time. This helps get figures painted and keeps me from looking over at a piece of scenery and going "hmmmm..."
The next month, I put the figures aside and concentrate on scenery, terrain, and non-people figures, (dogs, horses, farm animals, and livestock, lions, mules, etc.,), as well as buildings, furnishings, etc, for scenery and terrain.
This helps in the fact that it keeps me from getting "figure painting burnout", and helps me finish many long uncompleted projects that have been sitting and collecting dust for deca....errrr.....years errr....I mean.. "awhile".
So I went and am trying it for the month of June, focusing entirely on scenics, terrain, and non-people figures.
I'm impressed with what I have actually gotten completed.
Below are the items I have worked on and accomplished. I've added some before and after shots to get an idea of what can be done.
(CLICK ON PICTURE FOR LARGER VERSION)
Also, a lot of what I did here is proof that "You don't need to have an expensive kit, or expensive paints to make a nice piece of scenery."
You can use craft paints, and pieces of "stuff", or cheap toy items.
Let your imagination roam!
Toy Barn Conversion.
Those of you that have been reading for a while, know that about 2 months ago, I picked up a plastic toy barn at our local Goodwill for about 3 bucks.
Like the previous Ertl conversion I did for my western town, I decided to also rework this into something more useful on the tabletop.
 |
| (This is how it looked at the painting desk.) |
First things first, give it a good cleaning and when dry, prime it black with a rattlecan.
 |
| (Cleaned and primed. Ready for the next step.) |
After that it was deciding "how" I wanted the barn to be.
I decided I wanted it to be "half wood/half stone".
So I dug around into my Plasti-struct stuff and found some stone block siding.
A little cutting, and then adding some trimmed small coffee stir sticks and voila! Siding!
 |
| (Not exactly up to modern building codes, but it'll do...) |
After that it was painting.
Base coast was craft paints "Burnt umber", followed by a little "Nutmeg brown".
Stone was painted "Charcoal gray", and then a light "taupe grey" and a lighter touch of White were dry-brushed on to show the wear and bleaching of the wood.
Here are two shots of the finished product:
A couple of spray seals of matte clear varnish, and she's good to go!
Then it was onto the next project....another barn.
MDF Barn....
So the next project was the MDF barn that I picked up at the Little Wars Flea Market for 5 bucks.
The kit was plain MDF with a non shingle roof.
Some "Before" pics.
She's a "handyman special"....
Primed with black rattlecan.
Base coat of Burnt umber, with additional first coat of Nutmeg brown.
Roof slates done in Charcoal grey.
Bleaching wood done with Taupe Gray, and White drybrush.
Shingles from Plasti-struct.
Nuln Oil and Agrax Earthshade for weathering effects also.
Groundwork by Woodland Scenics.
Piers...(and not "Anthony"...)
So after the barn projects were done, I did a couple of scratchbuilt piers, made of wooden coffee stir sticks and heavy wooden dowel sticks.
Primed black, base color, Burnt umber, with Nutmeg brown, and then a drybrushing of Taupe gray, and some white as well as some Burnt Sienna.
Thatched roof shacks...
So after the piers, I wanted to try the process of making thatched roofs, and I needed a couple of low key, low class, cheap and easy cottages.
So with a wooden base, foamcore for walls, some wood coffee stir sticks. I made these two cottages.
The roof is made out of a double layer of heavy cardstock. with strips of an old bath-towel, cut and glued.. All was then painted with craft paints.
The roof on the first one is removable. while the roof on the second one is not.
It was also a time for some tree repair.
About 20 odd years ago when I was in Houston, I made some trees from a Woodland Scenic kit.
They've mostly held up under four moves, but I needed to repair some of them and mount them on better mounts than they were.
So I decided to make a few stands of tree groups, and used as bases some old Tex Mex Music CD's, that I found inside a CD case on the side of a road a few years back.
"With an Oink Oink here..."
28mm Pigs from TAG, (The Assault Group), that I picked up at Little Wars. Mounted on flat washers.
These were pretty easy to paint, and allowed me to play with some washes a little bit.
I didn't want "all pink" pigs, so I varied them.
Man, that's a lot of ham and bacon there....
Furnishings....
This month has given me the chance to work on some of my purchases from Little Wars and the purchases I made from Knuckleduster went straight to the painting table.
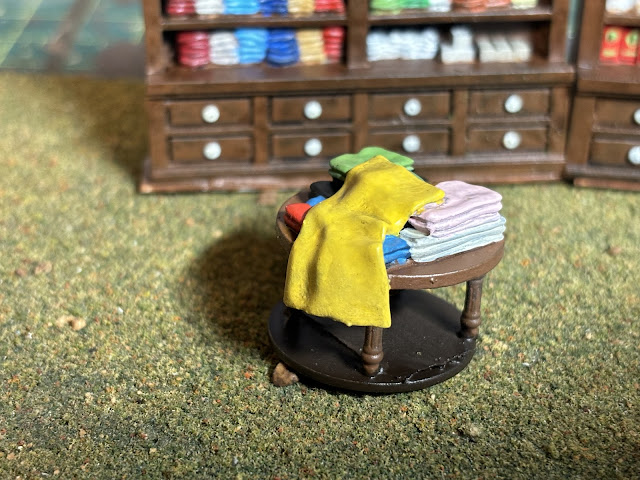
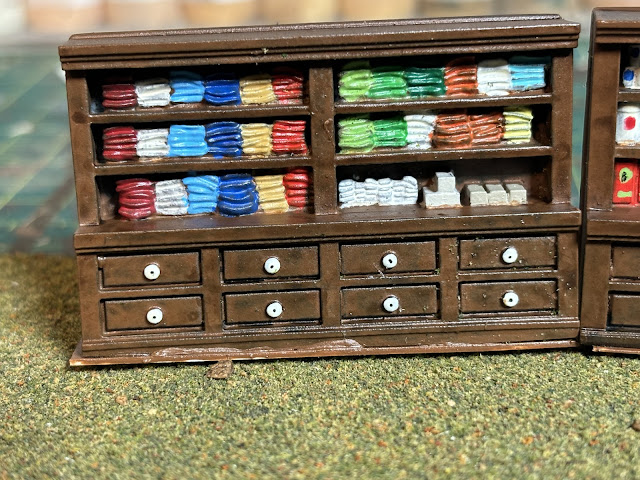
First up was some of the "General Store Furnishings".
These are cast resin pieces and after cleaning and priming, painted up really well.
 |
| (A table of fancy fabric, as well as two large sectional shelves and drawers filled with nice goods for you to spend your hard earned bank robbery money on. And don't forget to get you a penny stick of candy from one of the cups by the cash register.) |
And every fancy parlor needs fancy furniture.
These are made of metal.
And a grandfather clock.
This is a metal figure.
And some items from the Barbershop furniture by Knuckleduster.
 |
| (A nice collection of shaving mugs, and some lilac or rose water to help you smell so good!) |
Father's Day...
So Father's Day rolled around, and my wonderful wife, (Gawd bless her!), made me a nice dinner.
You didn't think that there wasn't going to be any "FOOD!" involved in this entry did you?
She made an amazing pot roast with homemade beer bread, and a couple of slices of sharp cheddar.
Dessert was sliced watermelon. Nice and cold, and tasty.
And later on that night, I fixed myself, "A Romulan Warbird" in my "shot" glass, (actually a tumbler)....
 |
| (Quite tasty...) |
And that is it for this entry.
I am currently working on some grocery items, some animals, an a scratch-built "Evil Snow White" fountain.
Stayed tune for there is more to come!
Thanks for reading!


