The Blog of Michael T. Murphy and his lifelong obsession with "little army men" and their imaginary glory, miniature wargaming, and other things...

Friday, March 3, 2023

Building a Western Town: The Livery Stable

 It's always a good thing when a project is finished. 

That moment of satisfaction when you can say, "Whew! That's it with this baby!"

For so many of us miniatures folks, we get immersed in dozens of "ongoing projects", that are always "halfway complete but never finished. For me it's a lot of scenery and buildings, and this year I decided to actually do something about it.

I started my Western Town back in 2017, IIRC, and yet even before then (around 2012 I think), I decided to modify/convert, essentially re-work an ERTL building to see how it came out.

The ERTL "Farm Country/Cowtown" buildings are literally made for 28mm Western Gaming. Made of Soft Plastic, they have to be thoroughly cleaned, cleaned again, and then primed to be able to hold the paint.  They are available on Ebay and Etsy.  You can use them the way they are but they are literally crying out for modification. 

In this case, I decided to make a livery stable.

And I decided to honor a friend.

My friend and "brother from another mother", Dan Merchant died of complications from COVID Pneumonia on Dec. 23rd 2021. It broke my heart knowing that I will never actually see him on this plane of existence and around our gaming table. So I decided to honor him by making him "The proprietor" of the Livery Stable.

Pics are as follows: (Click on pic for bigger pics)....

(This is what it looks like right out of the ERTL box)...

(After a very thorough cleaning, the hard plastic parts were primed with flat black. I used Krylon as Walmart had a sale!)


Then it was time to add the wood.
The wooden planks are from a box of 5000 wooden coffee stir sticks that I was able to get from Starbucks. I thanked them by getting a Vanilla Bean and a slice of Chocolate Mousse cake with sprinkles on top!
I used E6000 to glue each strip down. There was some measuring and some angle cutting involved, so patience is a virtue. The E6000 works great in these projects, and my ruler and Dremel kept me working properly.


(The back end with all the wood on. Diligent readers will notice that the wood is not "perfect or flush". Remember, this is a worn barn/livery stable. It wasn't built to be "absolutely perfect".)


I did the front the same way...

(Checking out to see how the front looks. So far so good...)

Next up was a test fitting of the entire thing...

(And the test fitting seems to be good...)

So I went ahead and continued, and finally finished it up.
Next up was painting.
I used the standard Apple Barrel and Folk Art craft paints. Base color was Burnt Umber, with wash and drybrush of Burnt Sienna and Cinnamon, and a very light drybrush of white for weathering.
Signage was added and his name was placed onto it.


(Sign and name for him...along with a US Cavalry recruiting poster...)


Additional signage and weathering was added, and all was finally completed and I was pleased at how it looked.
Now my best friend will always be on the table when we do Western games.


Thursday, March 2, 2023

End of Feb and the beginning of March...

 So my experiment in "four figures a day" has been somewhat semi-successful. When life isn't intruding upon it, I seem to get a lot painted. Case in point; for the month of February, I have gotten 55 figures painted and one building completed.

This breaks down to:

Building: The livery stable. (A conversion of an Ertl Cowtown building). This is the third building I have built since the beginning of the year.

Figures:

Fantasy Townsfolk: 10

Fantasy Gypsies: 2

Giant Mushrooms: 6

Dog: 1

Giant Rats: 2

Mimic: 1

Mules/Donkeys/Burros: 6

Cowboy/Gunfighters: 8

Pulp/Colonial figures: 4

Voodoo Zombies: 14

Zombie Master: 1

All in all not a bad tally for one months work. 


The easiest way to do this (the four figures a night), is the block painting method. Find a group of figures that are generally the same, and work on the major colors. Put some music or your favorite show or movie on in the background, (I am currently bouncing between Spotify/iTunes Radio/ and The ST: DS9 channel), and go to town. Paint for an hour or so and take a 5-10 minute break. Do 2-4 hours if possible, if not try the "one hour a night" method as that is quite workable also.

Remember that the idea is "to get the figures painted". This doesn't mean flocked, sealed, etc. I consider that "finished". Just get the colors on and get them ready for flocking and sealing.

So without further eloquence, I am showing off some of this months work.  (Please click on the photos for larger versions...I think.) 

Readers will notice that the pics of the figures seem to be "glossy". This is actually not the case. This is a result of my crappy Iphone 8 camera, and the bright OTT lamp that I use for lighting.

First up is the fantasy stuff.

Here's the "bed" mimic. He was pretty fun to paint up, and looks like a Disney Creation with a bad attitude. 


This was one of the Reaper Bones V figures IIRC. I needed some more monsters and wanted a fun thing to work on for a bit. Painting the same types of creatures and figures gets a little tiresome after a while.

Speaking of Disney, "Shades of Fantasia!"

(Reaper Mushrooms)


Again more figures from the Reaper KS. 
I'll be honest, I am quite pleased with the production (for the most overall part) of Reapers stuff that is coming out. I wasn't as thrilled with their latest KS (6) as I was with 4 and 5, and I think that for the most part I am pretty much well done on fantasy figures for a while. Unless there is something new, cool, and "ooooohhhh shiny!" that comes along.
But you always need more villagers and townsfolk....

(Reaper villager. Perhaps he is expressing his undying love to a maiden or perhaps trying to explain why he doesn't have the money he owes to pay back the loan that he took out?...)


(And what's a village without a happy, go-lucky gypsy guy to spice things up?)...


After this, I decided to paint up some supply mules, donkeys, and burros. The majority of these came for a TMP purchase I did many years ago. I like them because they can pretty much be used for just about any real period that I play, plus they can also be used as supply point markers, or even objectives!


(Juan Valdez would be proud...)


("Fifteen miles on the Erie Canal!...)


("Muuuuullllleeee  Traaaaiiiinnnn!!!")


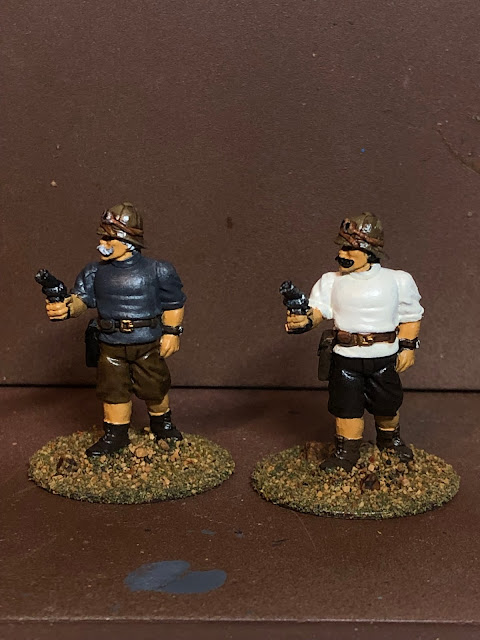
After the supply mules were painte dup, I went ahead and painted up a few colonial/pulp figures. Two of the figures were the same, so I did them in different paint jobs.


(Lord Balderdash keeps his pistol at the ready as he moves slowly forward...)


(Meanwhile his fellow officer companion, and friend Major Blunder, tags along warily...)


Here's a couple of side by sides to get an idea of the different paint jobs. These figures are from Pulp Figures and as always are a joy to paint...


After this, it was a couple of Foundry Ruga Ruga's...


Neither of them seem very like very pleasant chaps....

After the Ruga Ruga's, I switched over and painted up some cowboy/gunfighters.

Readers of Marvel Comics Western series will probably recognize this fellow as from "The series that Marvel wants you to forget."


(Wellll....helllooooooooooo there cowboy....)


And some more guys with their shootin' irons...


(Mister Thomas J. Petty, gunfighter and balladeer extraordinaire...)


(Jack Ashby, formerly a Captain of Cavalry, CSA...)


(Oscar Meyer, local citizen and member of "The Citizens Safety Committee...)


(Henry Dawson, another member of The Citizens Safety Committee. )


("Buckskin Dan Peters, realizing he's gotten into more than he can handle...)


(Samuel Masters, former sheriff, coming out of retirement to handle someone...once again.)


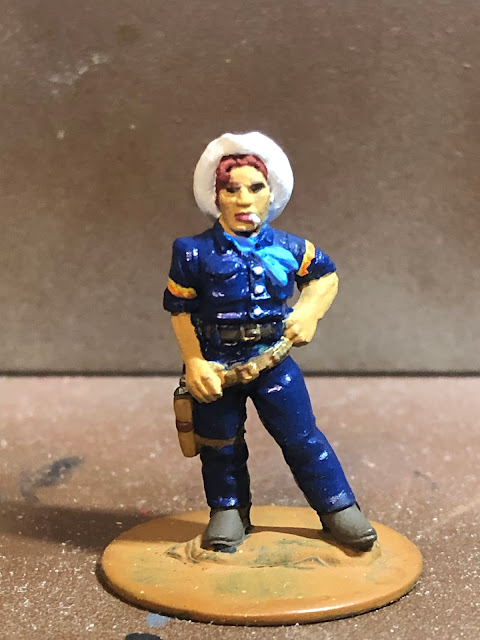
(William "Billy" Appleton. He has a bright blue shirt, a big pistol, and a short fuse....)


That's all for now. More figures and stuff to be coming down the pipeline!
Thanks for reading!


Sunday, February 19, 2023

February Progress....

 So during this month, it's been a slow meander down the old trail for me. 

I've been painting and working on trying to finish some horrible out of date projects.

Let's take a quick look at this months madness and shenanigans shall we?

(Click on pics to enlarge them.)

And we will start with the obligatory pics of FOOD!!!!

So recently my wonderful wife, (Gawd bless her!), and I were discussing "Food and changing up some of what we eat for dinner.", (we've gotten into a bit of a rut"), and so out of my head, I wandered down to the local stores and picked up stuff to make a nice Cajun style jambalaya.

"Andouille Sausage, crab meat, shrimp, bell peppers, onions, red beans and rice, all mixed and cooked up, with a good dollop of spices added for flavor. I like to use "Tony's" but wife starts to sneeze if she is around it when it is used.

So we fixed it up in the pot....

(Mmmmm.....)


Then it was time to eat...

(Jambalaya, with buttered and peppered Italian bread and peaches for dessert!"


Picking up some history...

So last weekend we went and did the "tax thing", and afterward I took my wonderful wife to our favorite town antique store here in town.
We dropped some bucks but it made her happy.
One of the thing I saw for sale was a "jug/pitcher".
I saw the decor on the side, and said "It must be mine!".
It didn't have a price tag on it, so I asked the guy behind the counter, "How much?"
He said "How does ten bucks sound?" 
I eagerly took it.


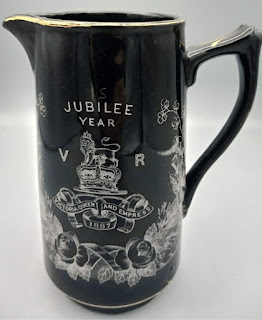
It's an 1887 pitcher/jug marking the jubilee year (50 years) of the reign of HRH Queen Victoria.
So now I can out drinks out to my friends in a proper period container the next time we play Colonials!

We were also lucky to get a good deal on a display case to display our antique whiskey decanters in.


(Nice and pretty with some of our stuff in it on display...)


(And what it looks like lit up...)


Truly I could have used another display case for miniatures and stuff, but I wasn't going to push it....

Paint Desk Progression.

Checking out my FB memories today, I saw that 2 years ago today I had set up my paint desk in it's current location. Actually, I had set in up in another location in the room, but it didn't do or feel right, so I had to move it. 
After looking at the pic, I decided to take a pic of "What it looks like 2 years later."...


(Feb.19th 2021)


(Feb. 19th 2023)

You can see that there has been a few "changes" made. Mostly the wear and tear of the foam-core I put there for the paint and workings, as well as the addition of another paint rack.  On the table next to me I have three six tier racks, each holding 54 bottle of 2 oz. craft paints and I need about six more. Truly one just never seems to have "right shade of blue or brown when they need it."
Speaking of the painting table...


Projects and WIPS

So the first thing I have decided to to is to simply focus on getting some of these unfinished projects, errrr...finished. As I get this done, I can actually see the progress and get that "Whew! It's done!" feeling in me. Finished projects just feel good, and I think that is something that we as mini gamers seem to have an issue with; the fear of finishing a project, vs the feeling of having it done, and ready to move onto the next one.
And so it is with this one:
I finally got around to finishing the conversion/building of the Livery Stable for my Western town. Years ago, (2012, I think), I started working on converting an ERTL "Cowtown" Barn. I like these buildings but they are crying for work to make them better. So I started working on this and then sputtered, and it went onto the back-burning. 
Fast forward to the end of last year and beginning of this year, and I get the fire lit under me to finally get it done.
So here's the "almost finished" building...
All construction and painting is complete. I just need to seal it and then add the signage.


Once the signage is in place after the spray seal it will be "finally complete".
Also, current WIP's...(far from finished).


(Mister, here's your mule!)


The next cowboy figure that I was working on, is from "The Comic Series That Marvel Wants You To Forget..."
(SWISH!)

(He's just lookin' for a little action....)


(Some no-name range rider with a gun, and a grudge to settle...)


(Ready to dish it out...)

An experiment in progress...

So a while back I was trying the experiment of "one hour a night", which yielded mostly positive results, but always seemed to end right when I was getting into the groove of things.

As a result of this, I am working for the next 30 days on a new process, which I called "Four Figures A Night".

The idea is that I get four figures (at least), painted each night. This does not include basing, (as they should pretty much be already based), primed, (already primed), flocked or sealed, (that's for later). No this is just to get paint on the based figure and get him ready for flocking and sealing.

If I can do four figures a night, that's good, anything more is gravy and I like to shoot for gravy.

So far since last night, I have painted up ten figures, (Six gunfighters, three mules, and a Colonial African Porter). So right now I am a bit ahead. If I can keep this up, (Taking Wed night off), I will be able to crank out (at a minimum) 24 figs per week, for 96 per month. That's quite an increase. 

Let's see how this works. I'll keep at it and report my progress.

More to come. Thanks for reading!